Wednesday, 29 October 2008

Week 5: 3D Face

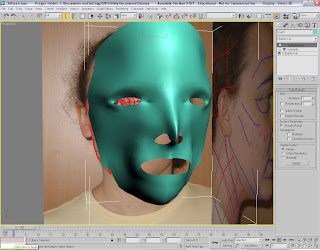
Now that the lines had been attched to create the Mesh for my face, I then selected Editable Poly from Modify Toolbar and selected Vertex then using the the Select tool I selected all the points on the line going down the middle of my face, and aligned them on the X axes so the line is staight down the middle of my face.

With the points down the middle of my face selected I slected the left view side and using the the Move tool move the points across the my face. The Plane and the Mesh of my face was not aligned properly so I Un-freezed the Plane by right click and selecting the option from the menu. I used the Select tool to select the Plane and moved the Palne into the rigth place, then I freezed the Plane again.


With the Mesh and Plane in the correct place I selected the Mesh of my face and went into Edit Poly and selected Vertex and I changed my viewpoint to the left hand side. I started to select each point and using the Move tool pu the points into the correct place to make the shape of my face, I also made the Mesh see through to make this task easier by going into Object Properties and selecting See Through from the list to make the shape of my face.


Once I had Pulled out the face I wanted make a duplicate so I added a Symmetry Modifier and selected the correct axes to make a duplicate of the face but facing the oposite way. I had to the move the new side of the face in line with other side of the face by going into Symmetry Mirror then using the move tool. I added a Turbo Smooth modifier to the face to make it look less edgie and bumpy.


Friday, 24 October 2008

Week 4: 3D Face

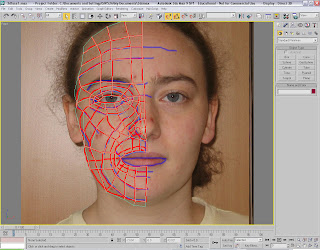
The next thing I did was change the viewport so the I could see the two Planes one showing the side view the other showing the front view of my face. I then selected the Line Tool and changed the two types to Corner to get straight lines.

I then made sure Angle Snap Toggle and Snap Toggel were both on, then I right clicked on the Snap toggle button and made sure only Vertex was selected from the list.

Once I had done this I used the Line Tool create the quads using the images lines as a guide to help create them. While I was doing the I did make slight changes to the quads that I did in Photoshop as in some areas they were placed wrong or I had a few too many in areas. Each quad is an individual spline. I left a gap for the eye, nostral and mouth.


Once I had created all the quads I selected one of the quads or lines right clicked on it and select Convert to Editable Poly. Then I went into Edit Geometry and selected Attach and from the menu I clicked the All button so all the Lines would attach together. Then in viewport I selected Edged Faces.


Week 3: 3D Face


I finished putting the quads on one half of the front view of my face in Photoshop.


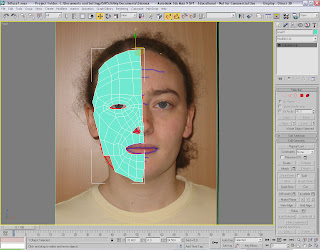
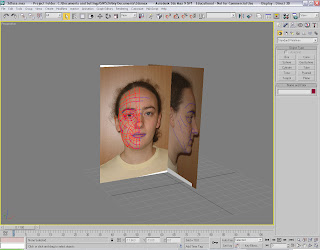
I then saved the Photoshop file then opened 3D Studio Maxs I first created a surface using Plane and changed the segments down to 1.


Once I had created the surface I used the Move tool to move the Plane into position. I then opened the Material Editor, then I selected a material and clicked on Diffuse, then from the list that come up I selected Bitmap, then I went through my files to find my psd file of the two view that I edited in Photoshop and selected to create the new material.


Once the material was created I clicked and dragged the material onto the Plane, I then added a modifier called UVW Map then from the options on the side I selected Bitmap Fit then selected the file I used to create the material. I then move the image on the Plane so it just shows the front view of my face.


I then created a a copy of the Plane then with the copy I edited the view to show the side of the face instead of the front view of the face. Then I the side view Plane so its to the side of the front view using the Move and Rotate tools to do this. I then freezed the two Plane objects so they won't move when I start to create my face.


Friday, 3 October 2008

Week 2: 3D Face

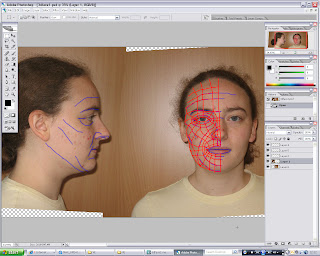
I have load the two views of my face side view and front view into Photoshop. I used Filter, Distort, Lens Correction to make the pictures of my face level. Once the two pictures are level i put the two pictures into one canvas. Then using the Ruler I aligned the two pictures so the eyes, nose, and chin were all level with each other.

When the pictue were level with each other I added another layer and used the Brush tool drawed lines of the structure of the face like cheek bone, nose, chin, this was done on the front and side views of my face.


I added another layer and using the brush tool I started to make quads on the face but only on the front view of my face leaving a gap for the eye and mouth. I only did the quads for half of the face as it can be duplicated in 3D Studio Max.

Monday, 29 September 2008

YMCA: Week 2

We went to the YMCA centre to get the information about the centre like what kind of activivites they provide for the public, and what they want to achieve out of the advertisement that we are going to create in a our groups.

The kind of activities they have at the YMCA are Writtle Junior Youth Club that is run on a Monday for school children age 6-13 year olds, they do fun activities like playing games to help them socialise with others in there own age group. This activitie is also available for teenagers up to the age of 18 years old.

Another activitie they do is Baddow Youth Club that is run on a Tuesday for school children age 6-8 years old, they promote and encourage Christian values within the community in a fun and friendly enviroment. They do a similar activitie called Westland Junior Youth Club that is run on a Wednesday for school children aged 6 years old and over. This activitie is also available for teenagers up to the age of 18 years old.

Another activitie is Social Acknowledgement that run on a Tuesday for school children aged 7-13 years old, what they do is to enocourage the youngsters to develop and deliver projects that they have an interest in. This is also available for older teenagers up to the age of 18 years old.

Another activitie they do is Young Carers that is run on a Wednesday for teenagers aged 13-18 years old, this provides support for young people who care for a relative.

Rock School is another activitie that is provided by the YMCA on a Thursday for children aged 7-18 years old, what they do is learn about music with others that are also interested in music.

The Y Club that is run on a Friday for school children aged 8-18 years old, there are different events that happens on alternative Fridays like DJ, Live Band, and Drum and Bass night.

They also provide a Breakfast Club, after School Club, and also a Nursery to children under school age.

The YMCA advertise about events using My Space and Facebook, they send information to primary schools that will send letters to the parents of the children about events happening at the YMCA.

The YMCA wish for us to create advertisement promoting event of our chosen activitie for the older age group (13-18 year olds) than the younger age groups. The advertisement should not be too serious to make it less boring to the teenagers.

After having the look round the YMCA we got into our groups, the people that are in my group are myslef , Ben, and James. Then we decided on what activitie we were going to do the advertisement about, we decided to do it on the Y club as they want to attract the older age group and we think we can advertise this to the older age group. We brain storm some ideas for the advertisement.



Monday, 22 September 2008

Week 1: Reflection on Brief

From the brief i have made out this module can be a fun and challenging with the two projects. There does seem to be alot of work to do the two projects with in the 12 weeks, but as one of the projects is group work and the other is idividual the work can be done with in the 12 weeks with work is done to a plan.

The idividual project is to create a 3d model of my face using 3d studio max, there is alot to take in with this as all the detail that must be taken into account from the two views of my face front view and side view. If any information on the detail is slightly off the model of my face will look lop sided. The detail will be recoreded using photoshop to trace the details, then this information will be used to create my face in 3d studio max.

The group project is based on the YMCA as a client and promote the different services run by the YMCA. In our group we need to create an animation promoting of the services in YMCA.